Stretch of the Week: King Arthur Stretch
Leave a CommentWeek 2 of this months quadriceps stretches is the King Arthur stretch. Hopefully you have tried week one, frog stretch I, and you have gotten some insight as to how tight your thigh muscles really are. If you have not tried that stretch yet, please go back and attempt it, as it is a good warm-up for this stretch. I do not recommend this stretch for people that have knee injuries or severe chronic knee problems, as it is hard on the knee. The benefits of this pose are: it stretches the hip flexors and the quadriceps.
Things you will need for this stretch are: a blanket, a wall, and possibly a block or two, or some heavy duty books in place of blocks if you don’t have any.
Week Two: King Arthur Stretch
How to:
- Begin by finding a wall, one free of decorations or furniture, with enough space to sit against. Place your blanket in front of the wall. Now kneel down on the blanket with your back to the wall so your feet are barely touching the wall.
- Coming to all fours start to take the left knee back far enough so that the left foot starts to go up the wall.The toes will be pointing towards the ceiling.
- Now take the right foot out far enough in front of you so that you are coming into a low lunge. Make sure that the right knee is stacked over the right ankle, think 90° angle here.
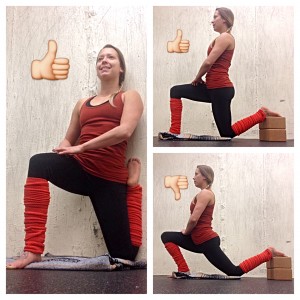
- Then you can place your hands on your right thigh and you can bring the torso up, your gaze should be straight ahead now. If you have gotten this far and you realize that once you come up it’s too painful or causes too much discomfort in the knee you can take yourself away from the wall and set up a few blocks or books as in the top right photo.
- Again making sure that the knee is in line with the ankle and not going over the toes, as in the bottom right photo, that will put too much strain on the knee. You do not want to do that. If you have gotten your left foot up the wall and you feel okay here and would like to go deeper, you can proceed to the next stage.
- To go deeper into this stretch, you can start to creep the left foot up the wall further, toes still pointing towards the ceiling.
- If you are very flexible here and are having trouble feeling a stretch you can start to bring the shin to the wall and then also bring the left heel to the outside of the hip as shown in the left photo below. Always be aware of where the front knee is relation to the front foot, make sure you can always see your toes!
- Once you have found your comfort level of the stretch, be it at the wall or by using the blocks/books, you can start to place your hands on your hips.
- Then see if you can get your hips level, you don’t want to your left hip hiking up higher than your right.
- From here tuck the tailbone towards the floor and at the same time pull the belly button towards the spine and also up into the ribs. This will engage your core, protecting your low back from any strain or pain.
- Once you are stable here you can begin to reach the arms towards the ceiling, this will increase the stretch through the front body.
Once you have found the level of stretch that is comfortable for you see if you can remain there for 10 full breaths. Then take a moment to rest in between switching the legs. See all other stretches here and follow Rachel Lackowski on Instagram for more stretches.

