Stretch of the Week: Simple Forward Fold
Leave a CommentSo we’ve made it through to the last week of November! Hopefully you are feeling a little less tension in the hamstrings by now. The final stretch of this month is a “simple” forward fold. I use quotations here because for some people this stretch is not necessarily that easy. But hopefully through this guidance you can make it comfortable and within your bodies capabilities to achieve. Over time those fingers will reach those toes comfortably, just remember to be consistent!
Benefits of the Forward Fold: blood comes the brain and helps to relieve mild depression or anxiety, stretches the hamstrings, helps to strengthen the legs and helps to improve digestion, just to name a few.
Things you may need for this stretch: a wall and a block or two, or a sizable book or something similar.
How To Complete The Simple Forward Fold:
- Stand up straight with hands at the sides.
- Exhale, bring the low belly in towards the spine and also up towards the chest at the same time.
- Bend forward from the hip joints as you exhale fully. As you come forward, draw the chest away from the belly button, this will create space in the front body, keeping you from collapsing in the chest. It will also keep your spine long, like when you are standing up straight. As you complete the forward fold, the emphasis is on lengthening the front torso as you move more fully into the position.
- Tip: try not to push the butt backwards as you come down, it can strain/pull in the lower back.
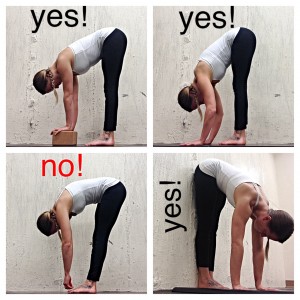
- If possible, keep your legs straight, but knees not locked, bring your palms or finger tips to the floor slightly in front of you. If this isn’t possible place a block/big book (as shown in the top left photo) in front of your feet and place your hands there. Having the legs straight with the hands elevated you give you more benefit of the stretch, as opposed to just bending the knees significantly.
- Press the heels firmly into the floor and lift the sitting bones toward the ceiling.
- Turn the thighs slightly inward. You can place another block/book between the thighs to help with internal rotation here. Squeeze it with your thighs like you are trying to shoot it behind you.
- Tip: refrain from rounding in the back as in the bottom left photo!! It will strain/pull on the back!
- Don’t just hang there, this is an active stretch.This is the number one thing I see people do when preforming this stretch, and then they wonder why their low back hurts. Keep the belly engaged as above the entire time!
- Every time you inhale, lift the chest slightly away from the belly button lengthening the front body, and with each exhale release a little more into the forward bend, pulling the low belly in and up.
- Let your head hang, and release the tension in the shoulders.
- Stay in the stretch for 30 seconds to 1 minute, or even longer if you like!
- Come out of the stretch just like you came into, slow controlled and with the engagement of the belly. Don’t roll the spine to come up. Instead bring your hands onto your hips and reaffirm the length of the front body.
- Press your tailbone down, into the pelvis and come up on an inhale with a long front body.
You can also do this stretch with a wall behind you as shown in the bottom right photo. It’s a little more challenging and you might feel like you will topple forward, but it’s a great way to not push the hips backward as you come down and a great way to protect the back! Do not do this stretch if you have severe low back pain! Try to find a teacher near you for guidance with this stretch in that case.
For additional stretches and tips, follow Rachel on Instagram: YOGINI_RACHEL and read Part III here.

